Transcribe Your Audio/Video Recordings Into Text Easier And Faster.


Transcription Helper lets you:
- Save time transcribing audio/video recordings into text.
- Control playback with hot keys. your hands never have to leave the keyboard. You can also configure your foot pedal to work with Transcription Helper.
- Automatically generate time stamps which you can use to jump to the exact locations within your recordings.
- Export your transcript into text document
Key Features of Transcription Helper:
- Supports most common audio and video formats (WAV,MP3,WMA,WMV,AVI...)
- Use Hot Keys to control your video or audio. You can also configure your foot pedal to work with Transcription Helper.
- Automatically generate time stamps. You can jump to the exact locations within your recordings and edit the transcript
- Save your work as project file, you can continue your transcription exactly where you left off the next time you open the project file.
- Automatically save your transcript.
- Supports auto rewinding. You can loop the playback of specific segment while you're typing.
- Export your transcript into text document.
Transcription Helper Screenshots
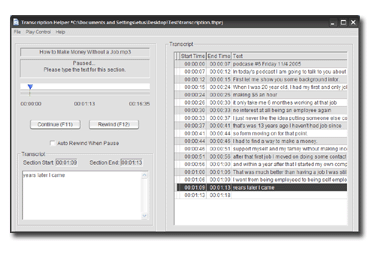
This is the main window of Transcription Helper.

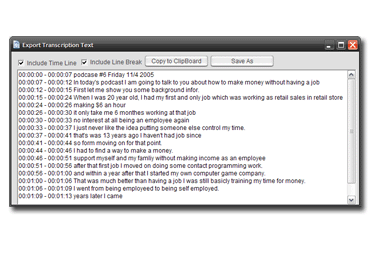
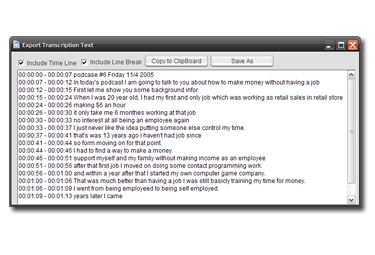
This is the export window of Transcription Helper.

Transcription Helper Quick Tutorial
This Quick Tutorial shows you how to transcribe your audio/video recordings into text in four easy steps with the help of Transcription Helper.
Introducing Transcription Window

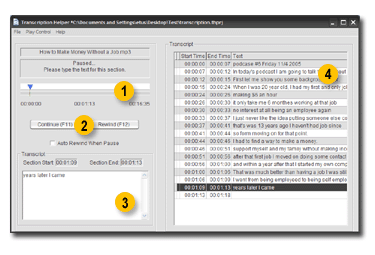
Most of your work takes place in the Main Window of Transcription Helper. As the figure shows, The Main Window contains four parts. The following list is their names and functions.
- 1 Timeline:Indicates the current position of playback.
- 2 Play Control:Play/Pause and Rewind Buttons
- 3 Typing Window:Type your transcript in this window
- 4 Transcript List:Time Stamps and Transcript, click the list item can jump to the specific segment.
Step 1: Select Audio/Video File
Before you start the transcription work, you have to select a media file. Click the "File" menu and select the "New Transcription Project" command. Transcription Help will open a dialog to ask you select a Audio/Video file.
Find the media file you want to work with from your hard drive and then click the "Open" button.
Step 2: Playback Control And Transcription
Basic Control
After you selected the media file you can click the "Play" button to start to play the media file. Click the same button can pause the playing. At the same time the program automatically generates the time stamp for the segment you just played. You can type the transcript for the segment in the typing window. If you want to rewind the segment just click the rewind button when the audio is paused.
Click the "Continue" button can continue the playing, and the program saves the transcript with the time stamps information to the list and start the next segment.
Check the "Auto Rewind when Pause" option can make the program auto rewind the just played segment when you pause the audio.
The program assigns hot keys "F11" to the "Play" button and "F12" to the "Rewind" button. So your hands never have to leave the keyboard. If you have foot pedal you can configure it to simulate the hot keys pressing.
Use The Time StampIf you want to edit the transcript of specific segment which you have already typed you can use the transcript list on the right side of the window. Just click the row of the list, the program will playback that segment and you can edit the text.
Drag&Drop The Timeline
You can use your mouse to drag the timeline, when you drop the mouse the program will seek the media and jump to the specific segment.
Step 3: Save And Open Transcription Project
You can save your transcription work anytime into a project file. The project file include the media file location and the transcript. You can continue your transcription exactly where you left off the next time you open the project file.
To save the project, just click the "File" menu and select the "Save Transcription Project" command. Select the path and type the name for the project then click the "Save" button.
To open the project, just click the "File" menu and select the "Open Transcription Project" command. Find the project file from your hard drive and then click the "Open" button. The program will load the media file and the transcript.
Step 4: Export The Transcript
When you finish your transcription work you can export your transcript for use in other programs.
To export the transcription, just click the "File" menu and select the "Export Transcription" command. The program will show you a export dialog.

Check the "Include Time Stamps" option can include the time stamps in your transcript.
Check the "Include Line Breaks" option can include the line breaks after each segments.
You can save the transcript into text document or just copy it to the clipboard.